By: Sarrinah
Ingredients
Sorry if I got it wrong!
A freshly baked cake smothered in frosting makes an irresistible homemade dessert. Intimidated? Start here. Whether you need a birthday cake for someone special or an over-the-top holiday cake, we'll teach you how to bake a cake that's moist and mouthwatering every time and how to frost it.
The first step to baking a gorgeous, mouthwatering cake is choosing a recipe to get you started. You can keep it simple with a classic vanilla cake recipe or a yellow cake with chocolate frosting, or you can choose a slightly showier recipe, like a chocolaty devil's food cake or a luscious red velvet cake recipe. If you're not a fan of frosting, try a German chocolate cake. We also a have a few birthday cake recipes you can make for a party. The possibilities are almost endless, but avoid angel food, pound cakes, and sponge cakes because they require a different method.
Sturdy, single-wall aluminum pans, with or without nonstick coating, are great cake pans. Here are other points to keep in mind: Dark or Shiny? We prefer shiny pans for achieving a golden appearance. If you use a dark or dull-finish pan, reduce the oven temperature by 250°F and check doneness 3 to 5 minutes early to prevent overbrowning. Sizes and Shapes. Many recipes call for either 8x1½-inch or 9x1½-inch round pans. they are interchangeable, but cakes baked in 8-inch pans generally require 5 to 10 minutes longer in the oven. Square and round pans could also be used as long as they're the size called for in the recipe.
Many recipes require some ingredients, such as eggs and butter, to stand at room temperature for a specified time. This is because room-temp butter blends more easily with other ingredients and room-temp eggs result in higher cake volume. (For food safety reasons, don't leave the eggs at room temperature for more time than specified in the recipe.) Tip: Never use melted butter when softened butter is called for. It will ruin the cake texture.
Nobody wants their cake to stick to the pan, so it's important to prep your pans before pouring in the batter. With the exception of angel food and chiffon cakes, most recipes call for greasing or lining the pan before baking. Depending on your recipe, here's how to do it: If your recipe calls for greasing and flouring the pan, use a paper towel or pastry brush to evenly spread shortening or butter on the bottom, corners, and 1 inch up the sides of the pan. (Or spray nonstick cooking spray.) Sprinkle a little flour into the pan; tap the pan so the flour covers all greased surfaces. Tap out any extra flour into the sink. If a recipe calls for lining the pan with waxed or parchment paper, place the pan on the paper and trace around its base with a pencil. Cut just inside the traced line; line the bottom of a lightly greased pan with the paper, smoothing any wrinkles or bubbles. Unless otherwise specified, grease and flour the lined pan, too. Tip: For chocolate cakes, use cocoa powder instead of flour to coat the pan. Cocoa powder prevents sticking and enhances the cake's flavor, and traces of it won't be obvious after the cake is turned out of the pan.
Dry ingredients usually include flour, baking powder and/or baking soda, and salt. Rather than adding each dry ingredient individually to the batter, mix them together in a bowl beforehand. That way you know that the ingredients are equally distributed throughout the batter.

Dry ingredients usually include flour, baking powder and/or baking soda, and salt. Rather than adding each dry ingredient individually to the batter, mix them together in a bowl beforehand. That way you know that the ingredients are equally distributed throughout the batter.
Wondering how to make a cake with light, tender texture? A crucial step is to make sure the butter (or shortening, if specified in the recipe) and the sugar are perfectly combined. Here's how: Using an electric mixer on medium to high speed, beat the butter for 30 seconds. Generally, a stand mixer requires a medium speed for this step and a hand mixer requires a higher speed. Add the sugar in small amounts, about ¼ cup at a time, beating on medium. Scrape the sides of the bowl as needed. Adding the sugar little by little incorporates more air into the mixture. Beat the mixture on medium speed until it is combined and has a light, fluffy texture. (This will probably take 3 to 5 minutes. Don't cheat on your timing.) Scrape the bowl occasionally while beating. Tiny bubbles will be created as the butter and sugar are combined, which will give your cake that dreamy, light, fluffy texture.

Break one egg into a custard cup. (This way if you get shell fragments, you can easily fish them out of the cup rather than try to get them out of the batter.) Add the egg to the butter-sugar mixture and beat well. Repeat with the remaining eggs.

Alternate between adding some of the flour mixture and some of the milk (or other liquid specified in the recipe) to the butter-egg-sugar mixture, beating on low speed after each addition until combined. Begin and end with the flour mixture. (This is because when liquid is mixed into flour, gluten begins to form. Too much gluten makes for a tough cake, so be sure to start and finish with flour, and not overmix once you add liquid.) Tip: Be careful not to overmix at this stage or else you might get elongated, irregular holes in the finished cake.

Divide the batter evenly between the baking pans. Use an offset metal spatula to spread the batter in an even layer. Be sure to spread it to the pan edge. Bake your cake according to your recipe's direction
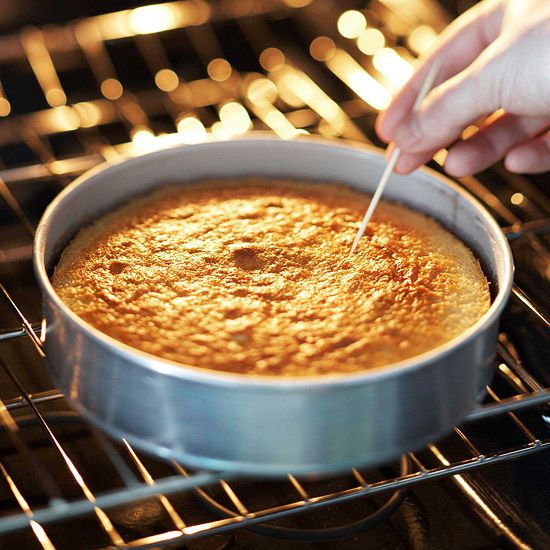
How do you avoid a dry cake? Avoid overbaking it. Start checking the cake for doneness after the recipe's stated minimum baking time. For creamed cakes, insert a wooden toothpick near the center of the cake. If the pick comes out clean, the cake is done.
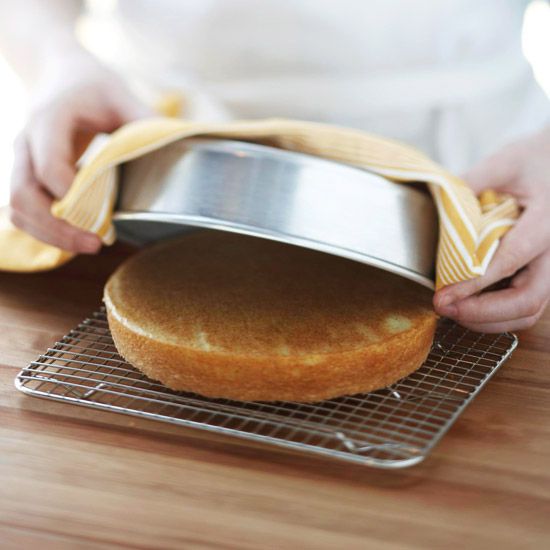
Let the cakes cool in the pans for 10 minutes maximum. To remove from the pans, run a knife around the edges of the cake to loosen it from the sides. Place a wire rack over the top of the cake and flip the pan. Lift the pan off the cake, being careful not to tear the edges of the cake. If you used waxed or parchment paper, gently peel the paper off the cake. Allow the cake to cool completely (about 1 hour). This is a key step to letting the cake firm up, making it less likely to break apart as you frost it. (And it keeps the frosting from melting as soon as you spread it!)

To avoid crumbs in your frosting, brush the cake layers with a pastry brush before assembling. Spread about ½ cup of frosting over the first layer, then carefully top with the next layer. Repeat until the cake is assembled.

Add a crumb coat by spreading a very thin layer of frosting over the sides and top of the cake. This initial coat doesn't need to look perfect; it's another way to keep the crumbs out of the frosting. Let the cake stand for 30 minutes so the frosting sets up.

You can decorate anyway you want! :) Thanks for reading, I hope your cake turned out well if you made it! :)